
Healthy meals is nutrition that is unfastened from harmful components and includes vitamins and minerals which are beneficial to our bodies. But generally we discover it difficult to acknowledge that our possess cooking contains organic food? If you're searching for The Ultimate Seeded White Sourdough recipe or are approximately to prepare dinner this The Ultimate Seeded White Sourdough recipe, then you have come to the right place. You'll also discover numerous other natural recipes here. We present only the best of these The Ultimate Seeded White Sourdough recipes.
Here too you'll get hints for organic living by using studying the article approximately Deadly Chance Due To Normal Consuming Junk Food below. Finish studying the thing below then we go to the recipe The Ultimate Seeded White Sourdough.
It cannot be denied that junk foodstuff is definitely one of the fashionable foods of many people. No wonder the eating places that supply junk foodstuff are scattered all over the world. Quoting healthline.com, an research of Food Institute information from the US Bureau of Exertions Data says millennials spend 45% of their nutrients budget on dining out. Junk foodstuff is the choice. Youngsters there's not anything incorrect with dining rapid nutrients from time to time, dining out can impact your health. In fact, it's renowned that the menus in speedy food eating places can often have a destructive impact on well-being in the lengthy run. Launching from washingtonpost.com, consuming junk nutrients is linked to a better chance of obesity, depression, digestive problems, heart disorder and stroke, variety 2 diabetes, cancer, and premature death. The more junk food you eat, the fewer probable you are to devour the necessary nutrients your physique needs.
The fourth dysfunction is kidney disorder. Apart from bad fats, junk nutrition also has a high sodium content. This sodium content can impact the performance of the kidneys. That way, the kidneys cannot function to correctly filter out pollutants in the blood. In animal studies, it has been proven that eating rapid nutrition can harm the kidneys in a way similar to variety 2 diabetes. In the study, published in the journal Experimental Physiology, rats were fed junk foodstuff made of chocolate, marshmallows, biscuits and cheese for 8 weeks. Any other mice were fed chow which was 60 percentage fats for five weeks. With the aid of studying the blood sugar levels of the mice and their blood sugar-transporting operate in the rats' kidneys, the researchers have been capable to see what happened to the kidneys of mice that ate speedy meals and fatty foods, compared to the kidneys of mice with diabetes. Meanwhile, the fifth results of junk meals is liver damage. The chance that is really deadly from junk foodstuff is liver damage. Eating junk nutrition with out exercising is equal to persons consuming alcohol. This also factors scarring within the liver. Thus, the liver does no longer paintings safely and optimally. A examine carried out on a group of scholars at Linköping University in Sweden, examined the results at the liver after consuming junk foodstuff excessive in saturated animal fats with out the balance of exercise. The researchers discovered that once a month, there have been elevated levels of liver enzymes, which are used as indications of liver damage.
The final one is gaining weight. A examine on rapid nutrition and coronary heart well-being published within the US National Library of Medicine, found that eating fast nutrients more than once per week was linked to a far better danger of obesity. When dining speedy nutrients more than two times a week was associated with a higher threat of metabolic syndrome, variety 2 diabetes and dying from coronary heart disease. The 5th hazard of consuming junk food can cause you to be impatient and have a favor to devour constantly. Eating candy cupcakes or donuts can increase your blood sugar levels, leaving you feeling glad and convinced for a while. Yet as soon as your blood sugar returns to normal, you'll believe even more irritable. Speedy nutrients is packed with subtle carbohydrates which cause blood sugar levels to fluctuate rapidly. If sugar degrees drop to very low levels, it may cause anxiety, confusion and fatigue. With a high sugar and fats content, you have a tendency to consume too rapid and an excessive amount of to meet your cravings. This may instill impatient behavior while faced with different things. Speedy food and processed foods could be loaded with man made flavorings and preservatives including sodium benzoate which has a tendency to extend hyperactivity. Speedy food is specially designed to make you addicted with the excessive salt, sugar and fats content that makes you crave for it. The addictive nature of speedy nutrition can make your brain crave it even once you are not hungry. Excess energy from speedy nutrients can result in weight gain. This may end up in obesity. Weight problems raises the chance of breathing problems, including bronchial asthma and shortness of breath. The extra weight can put pressure in your coronary heart and lungs and symptoms can show up with even minimal exertion. You've got difficulty respiratory when walking, climbing stairs, or playing sports. For children, the risk of respiratory difficulties is clear. One study discovered that kids who ate rapid nutrition a minimum of thrice per week have been more likely to grow asthma.
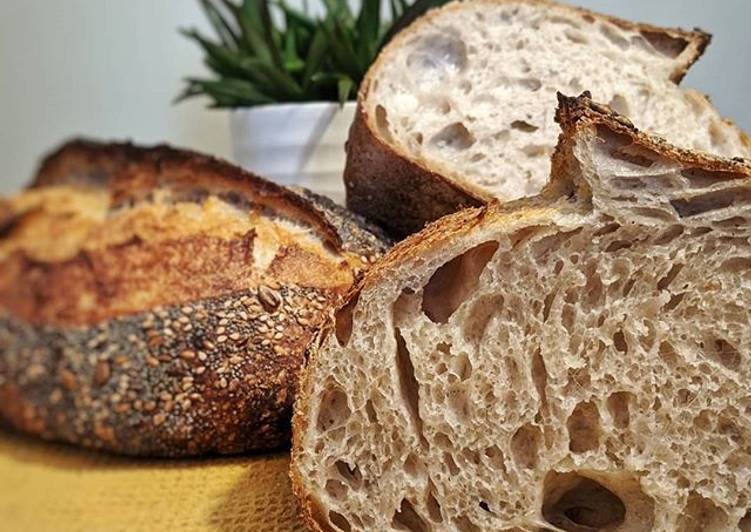
Now that you have complete examining the above article, let's jump to the the ultimate seeded white sourdough recipe. To make the ultimate seeded white sourdough you only need 14 ingredients and 31 steps. Here are the steps on a way to prepare dinner it.
The ingredients needed to make The Ultimate Seeded White Sourdough:
- Prepare of The Levain.
- Take 45 g of Active sourdough starter.
- You need 90 g of Water (30-35 degrees centigrade).
- Get 45 g of Strong white bread flour.
- You need 45 g of Rye flour.
- Provide of The Dough.
- You need 800 g of Strong white bread flour.
- Take 560 g of Water (30-35 degrees centigrade).
- Get 16 g of Salt.
- Provide of Mixed Seeds (optional).
- Use of Non-Essentials.
- You need of Mixed seeds for the crust.
- Take of Rice flour for dusting bannetons.
- Take of Semolina for finishing the bottom of the bread.
Steps to make The Ultimate Seeded White Sourdough:
- It's 9am on day one and it's time to start baking. The first job for the day is creating our levain. This is essentially a big feed of our sourdough starter to make absolutely sure that he/she (mine is called Bert) is well fed and ready to make bread..
- Your starter should have risen since it's last feed and be bubbly in texture. A good way to test its fitness is to take a small amount and carefully place it in some water. If it is sufficiently bubbly it will float on the top. If it sinks it perhaps a little longer to wake up or might even need feeding again..
- Add 90g of luke-warm water to a container and combine it with 45g of your active starter. Mixing the starter with the water first makes it really easy to ensure the yeast in the starter are evenly distributed in your levain..
- Next add 45g of white bread flour and 45g of rye flour and mix well. I do this step in a plastic beaker. Its tall narrow shape and see through sides make it is really easy to monitor progress as it slowly rises up towards the top. It's a good idea to loosely cover it with something. I have an old shower cap that I reuse every time I make bread..
- Next you have to wait for your levain to double in size. How long this takes will depend on the temperature in your kitchen and how active your starter is. For me it is generally between 5-7 hours..
- It's now about 3pm and your starter has doubled in size. It's time to get started on our main dough. Add 800g of white bread flour to a mixing bowl and combine it with 560g of luke-warm water. Mix it until it forms into a shaggy ball. We aren't doing any kneading here, our only concern is that the flour is well mixed with the water..
- We now have to leave the dough to rest for 30 minutes so the flour can fully hydrate. This resting process is called an autolyse and its a magical process. It's worth taking a pinch of dough from the top of the ball and stretching it gently upwards before and after this rest period to appreciate the transformation. Before the rest you will find the dough is fragile and breaks off into a lump quite easily. After the rest it will stretch much further and be considerably more elastic..
- After the 30 minute autolyse, we are now ready to mix in the rest of the ingredients. Take all of your levain and place it onto the dough. Then sprinkle over 16g of salt..
- Mixing this can get really messy, the levain in particular is super sticky and is a bit tricky to wash off your hands. As such, I tend to start by taking a piece of dough from the edge of the bowl, stretching it gently upwards and placing it over the levain. I rotate the bowl slightly and repeat this motion until I have done a compete turn and fully contained the levain and salt. This is not strictly necessary but I find it helps to keep my hands slightly cleaner!.
- Next I use my thumb and forefinger to squeeze through the dough and cut a small piece off one side. I move about an inch or two further into the dough and repeat this motion until I have made my way across the whole dough. I then rotate the bowl ninety degrees and repeat the process. Once again, this is not strictly necessary but I do find it a very effective way to quickly and evenly distribute the levain and salt throughout the dough without getting too messy..
- Next we will turn the dough out onto the kitchen worktop and begin a process known as "slap and fold". This involves taking the dough in both hands and slapping down on the bench. A gentle flicking motion is useful to encourage the dough to stretch out away from you. After the slap we then take the side of the dough closest to us and fold it over the other half. Then we pick up the resulting ball, rotate it ninety degrees and do it again. Repeat this 30-40 times until well-mixed..

- Use a bench scraper to gather the dough into a ball and place back into your bowl. Loosely cover the dough and set a timer for 15 minutes, and leave it to rest..
- After the 15 minutes is up we need to do another process called "stretch and fold". Take a small handful of dough from the edge of the bowl and stretch it gently upwards. By now it should be really stretchy but there will still be a point that it starts to resist you and if you go beyond this it will tear. This is not a good idea. Once stretched gently lay it down across the dough. TIP: Wetting your hands before doing this process makes it much less likely that the dough will stick to you..
- Rotate the bowl a bit and repeat this process until you have gone all the way around the dough. This might be 6-8 rotations. You will know when you get back to the beginning because you will hit a bit of dough that doesn't want to be stretched. This is because you have already stretched it! Re-cover the dough, set the timer for another 15 minutes and leave it to rest. We will repeat this process every 15 minutes until we have done a total of four sets of stretching and folding..
- By the time we've completed four lots of stretch and fold it is probably about 4:30-5pm. It's now time to leave the dough to proof. Keep the dough loosely covered, ideally somewhere thats not too cold. If your house is a bit chilly you can put the dough in the oven with just the oven light on to generate a little bit of warmth. This period, also known as bulk fermentation, will usually take about 4-5 hours..
- Its now about 9:00-9:30pm and our dough is ready to shape. Gently turn the dough out of the bowl onto a lightly floured worktop. We want to be gentle with the dough so we don't tear it and break all the structure we built up earlier with the stretch and folds. I use a dough scraper to work my way around the bowl, loosening the dough from the edges. Then I turn the bowl upside down and let gravity slowly do the work of pulling the dough out of the bowl..
- Take a small handful of flour and use it to draw a line across the middle of the dough. Then use your dough scraper to cut through this line and separate the dough into two equal-sized pieces. The flour should prevent the dough scraper from sticking too much..
- Take one of your dough balls and gently lift the left-hand edge, and fold it onto the middle of the dough ball. Repeat this three more times folding in the right side, the edge closest to you and the far edge. Once all four edges are folded in give it a little pinch where the folds meet to seal it and flip the dough ball over. You should be left with a nice tidy dough ball with a smooth top. Repeat these steps for the other dough ball. We then leave these to "bench rest" for about 20 mins..
- It is now time to shape our loaves! Start by lightly dusting the top of the dough ball with flour and then flipping it upside down. You may need the bench scraper to persuade it to separate from the bench. Gently lift one side of the dough, stretch it slightly and fold it into the middle. Then repeat the process for the other side..
- Next take the far side of the dough and start to roll it towards you. The goal here is to create tension on the outside of the roll. Use your thumbs to help keep the dough tucked in tightly as you roll..
- Once it is all rolled up use your palm to squeeze the edge closes to you and seal the edges together to form a seam..
- Roll the dough onto its seam. This is now the bottom of your loaf. You will probably find that the pointy ends of your loaf are a little messy. You should be able to stretch the dough over these end bits to tidy them up if you want to..
- If you want a seeded crust then now is your chance. Pick up the loaf, flip it upside-down and press it into a dish of seeds. Keeping the loaf upside-down transfer it to a floured banneton. To reduce the chances of your loaf sticking to the banneton I would recommend using rice flour. If you don't have any then bread flour should work just fine. If you don't have a banneton you can use a bowl or dish lined with a clean, floured tea towel..
- Another technique that can be useful is to "stitch" the seam together by taking a small pinch of dough from either side of the seam and twisting them together..
- Next I sprinkle the bottom of the loaf (now on top) with semolina. This prevents the cover from sticking to the loaf over night and also gives a really nice texture to the bottom crust after it is cooked. Rice flour or bread flour will also be fine. Then cover the loaves and place them in the fridge over night for their second period of cold fermentation. This long, slow process will really help develop the classic sourdough flavour..
- The next morning it is time to bake your bread. For the best results I would recommend cooking the bread inside some kind of casserole dish, a cast-iron dutch oven or even a massive pan. This has two benefits. Placing the loaf onto a screaming hot pan helps your bread to rise in the early stages of cooking. The addition of a lid creates a steamy environment for the loaf to cook in. This ensures the crust stays supple and allows the loaf to expand, rather than it being dry and restrictive..
- Once your oven and dish is preheated as hot as the oven will go take your loaf out of the fridge and gently turn it out of the banetton into the pan. The seeded side that has been underneath all night in the fridge should now be on top. Next slash the loaf along its length with a sharp knife or razor blade. This will ensure the loaf expands in a controlled manner rather than randomly exploding out the side or bottom..
- Next lightly spray the loaf with a bit of water. Something like a plant mister is ideal for this. Failing that you could use an empty, well-cleaned, cleaning product bottle or just flick some water on with some wet hands. This is another trick to help keep the humidity up in the early stages of cooking..
- Carefully put the lid onto your container and move it into the middle of the oven. At this point you should drop the temperature to about 220 degrees centigrade and set the timer for 25 minutes. When the timer goes off remove the lid and cook for another 15-20 minutes until golden brown..
- Remove your bread from the oven and leave it somewhere to cool. The smell is amazing and it's very tempting to cut into it right away but it really is best left to cool for at least an hour, ideally longer, before slicing. Put your container and its lid back in the oven to heat up ready for your second loaf!.
- I hope you enjoy making your bread! If you have any feedback or questions, please leave a comment. Good luck!.
Hopefully the The Ultimate Seeded White Sourdough recipe and the article above are beneficial for you. Thanks for travelling and don't overlook to share.